
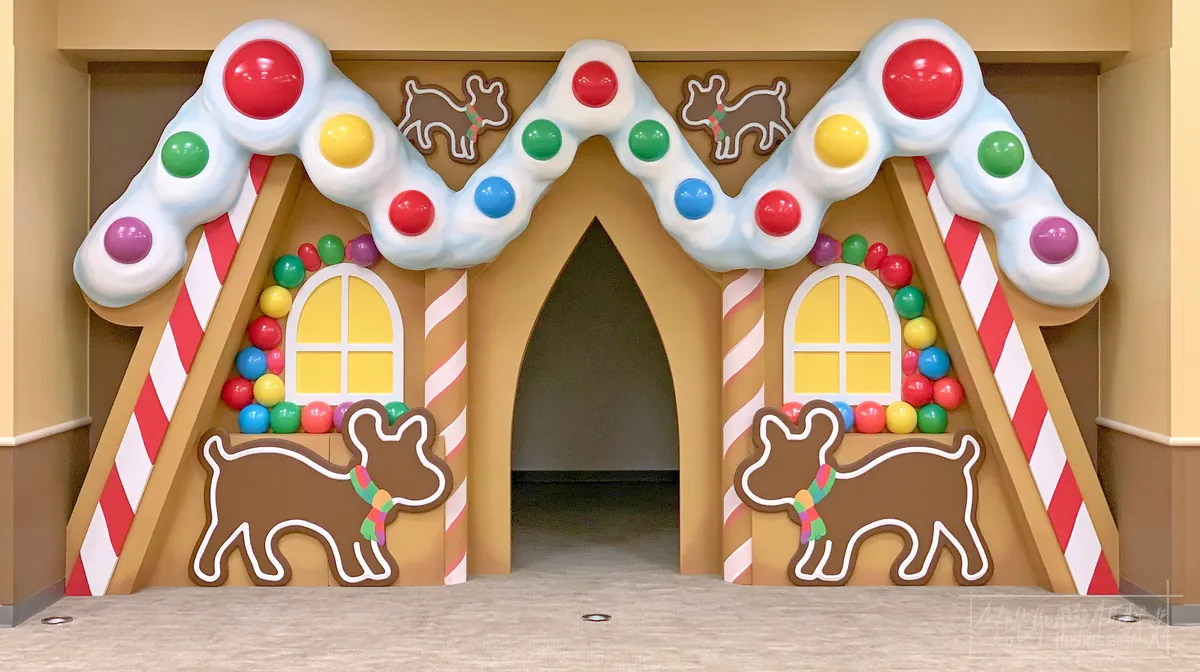
There’s something about a giant gingerbread house that makes an ordinary entrance feel like a storybook scene. The oversized candy decorations, snowy roof, and colorful cookie details bring a playful charm that smaller decorations simply can’t match.
If you’ve been thinking about making your own DIY life-sized gingerbread house outdoor decor, you don’t need to build an actual house. A freestanding wooden frame, painted panels, and lightweight foam decorations can create the look of a full-sized gingerbread cottage without the complexity of permanent construction. You can find most of these materials at local hardware stores, home improvement centers, or craft shops. Lumber and Masonite panels are usually available in the building materials section, while foam and other decorative accents can often be found in craft supply stores or the home décor aisle. Having a quick idea of where to shop helps you get started with confidence.
The ideas below focus on the details that make a gingerbread house feel special, from peppermint columns to giant decorated cookies. The first designs work beautifully for covered entrances and indoor displays, and with suitable weatherproof materials and proper support, many of these details can be adapted for outdoor use.
Build a Life-Sized Gingerbread House Entrance with Wood and Masonite
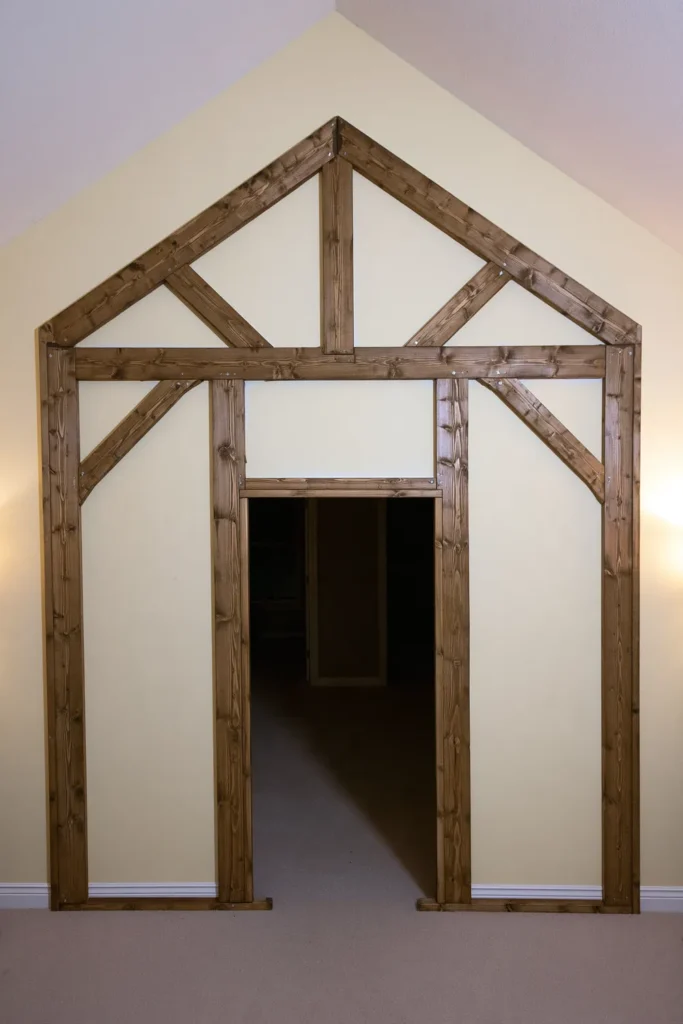
The easiest way to make a life-sized gingerbread house feel convincing is to start with a full-height entrance that people can actually walk through. Instead of constructing four walls and a complete building, you can create a freestanding facade that gives the impression of a gingerbread cottage when viewed from the front.
A frame built from 2×4 lumber provides the basic house shape, while Masonite panels create smooth surfaces for the gingerbread-colored walls. A pitched roof at the top gives the structure its recognizable cottage silhouette.
I like this approach because the frame and decorative surfaces have different jobs. The wood provides the main support, while the panels give you a place to add painted details, foam decorations, and oversized candy accents.
Paint the front panels a warm gingerbread brown rather than a very dark chocolate shade. The slightly lighter color makes white icing details and colorful candy decorations stand out more clearly.
You can leave a doorway opening in the middle and arrange the decorative walls symmetrically on either side. This forms a welcoming entrance without needing to construct an enclosed space.
For a covered outdoor display, protect the panels with an appropriate exterior finish and keep their edges away from standing water. Standard Masonite can swell when exposed to moisture, so exterior-rated panels are a better choice for an exposed location.
The timber frame also needs secure anchoring appropriate to the installation site. Large decorative facades can catch the wind, even when the attached ornaments are lightweight.
If the back of the gingerbread house will be visible, you can conceal the exposed framing with a fitted covering. The first concept uses a plastic tablecloth, which works for a temporary indoor setup. Outdoors, choose a securely attached, weather-resistant covering that cannot flap loose.
Once the basic structure is standing securely, you have a blank gingerbread house ready for all the fun decorative details.
Create a Snow-Covered Gingerbread Roof with Carved Foam
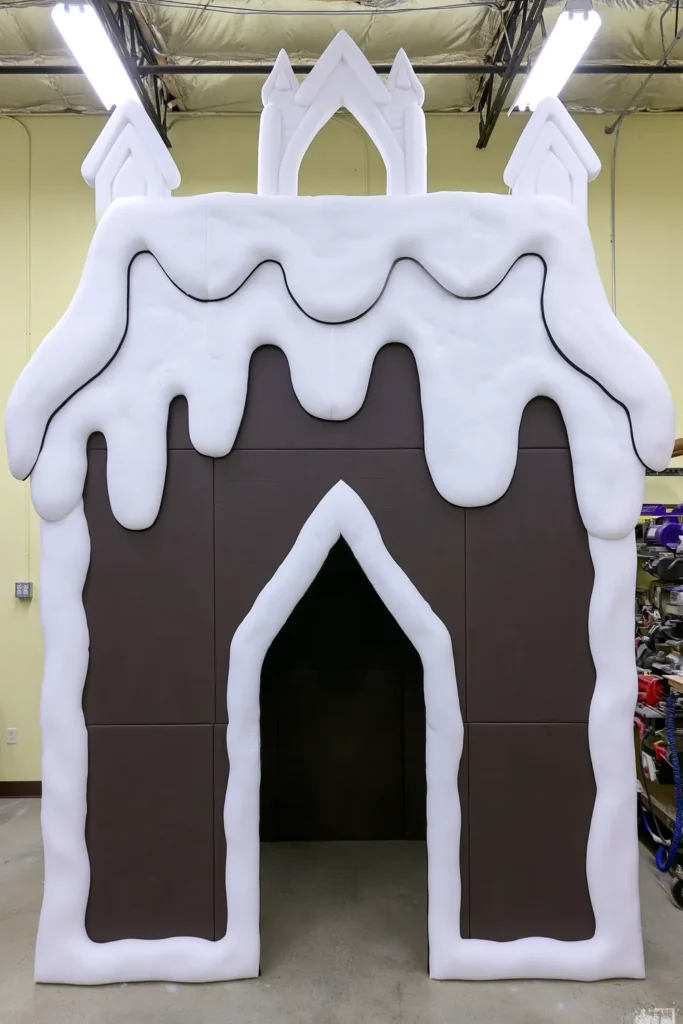
A thick, snowy roof is one of the details that makes an oversized gingerbread house look like an actual decorated cookie cottage.
Rather than applying a thin white stripe along the roofline, use carved insulation foam to create the appearance of heavy snow resting on the pitched roof.
The foam can be shaped into rounded edges and uneven drifts that extend slightly over the gingerbread-colored walls. These soft, irregular shapes look much more natural than a perfectly straight strip.
White paint gives the foam its snowy appearance, while a light dusting of glitter provides a subtle sparkle when the surface catches the light.
I would keep the snow mostly white rather than mixing in too many colors. The roof already sits above a facade filled with bright candy decorations, so the simple snowy finish helps balance the overall design.
One nice detail is to make the foam appear thicker near the roof edges, as though snow has gradually accumulated there. You can vary the curves along the edge to create a more sculpted effect.
If you’re installing the display outside, use a foam-compatible exterior coating that protects the material from moisture and sunlight. Good options include water-based exterior latex paint, foam-safe clear coats such as Minwax Polycrylic, or specialty outdoor sealants like Flex Seal (liquid version). For gluing foam, consider adhesives labeled as foam-safe, such as Loctite PL300 Foamboard Adhesive or Liquid Nails Projects Construction Adhesive (for foamboard). Check that your adhesive and paint are suitable for insulation foam, since some solvent-based products can damage it.
The carved pieces should also be mechanically secured or attached using an appropriate outdoor-rated system so they cannot detach in windy conditions.
Keep the roof decorations lightweight and refrain from adding heavy ornaments along the outer edges. The goal is to create the illusion of a thick layer of snow without placing unnecessary weight on the structure.
Against the warm brown gingerbread walls, the white roof creates a clear contrast that helps the entire house stand out from a distance.
Frame the Entrance with Giant Red-and-White Peppermint Columns
Giant peppermint columns are a simple way to give a gingerbread house entrance that distinctive candy-shop appearance.
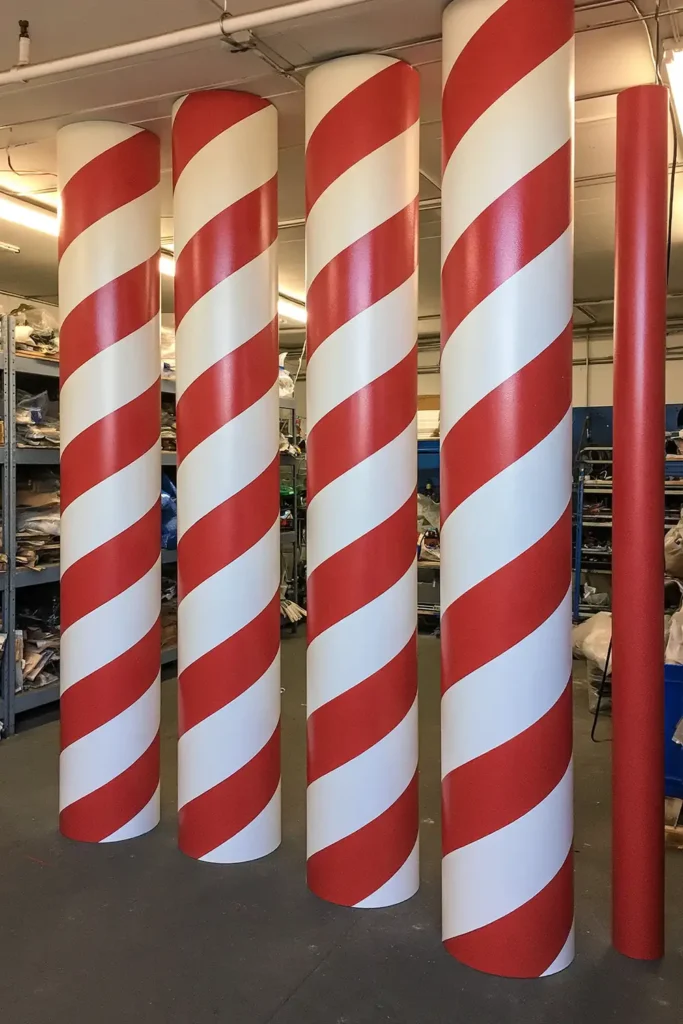
The first design uses PVC tubes painted in alternating red and white sections to resemble oversized peppermint sticks. Placing one on each side of the doorway creates a balanced entrance with plenty of visual impact.
Start with smooth PVC tubes sized to suit the height of your gingerbread house. A pair of tall columns works especially well beside a full-height doorway because they accentuate the scale of the entire display.
The most recognizable peppermint pattern is a bold red-and-white spiral. You can create it by marking diagonal bands around each tube and carefully painting the alternating sections.
A glossy cherry-red finish makes the stripes look similar to hard peppermint candy, while clean white sections keep the pattern bright and easy to recognize.
I would avoid using several shades of red on the same column. A consistent cherry-red color gives the decoration a more finished appearance and helps the two columns match.
Position the columns close enough to frame the doorway without reducing the clear walking space. When both sides are evenly spaced, the entrance looks much more intentional.
For outdoor use, it is important to clean and prepare the PVC surface before you paint. Start by washing the PVC with warm soapy water to remove any dust, dirt, or manufacturing residue, then rinse and let it dry completely. Lightly sand the surface with fine-grit sandpaper to help the paint stick, and wipe away any sanding dust. You can also use a lint-free cloth with rubbing alcohol for a final clean. Once the PVC is clean and dry, apply paint designed specifically for use on plastic materials. Finish with a compatible exterior-rated topcoat to help protect the painted surface from peeling and fading.
The columns also need stable mounting. Rather than relying on adhesive alone, secure them to the main frame or another properly supported base so they cannot tip over.
These tall peppermint decorations work particularly well with the snowy roof above them. The white roof and striped red-and-white columns share the same colors, helping the whole design feel connected.
Decorate with Oversized Hogwarts House Mascot Cookies
If you want to give your gingerbread house a more personal theme, oversized mascot-shaped cookies are a creative alternative to traditional gingerbread figures.
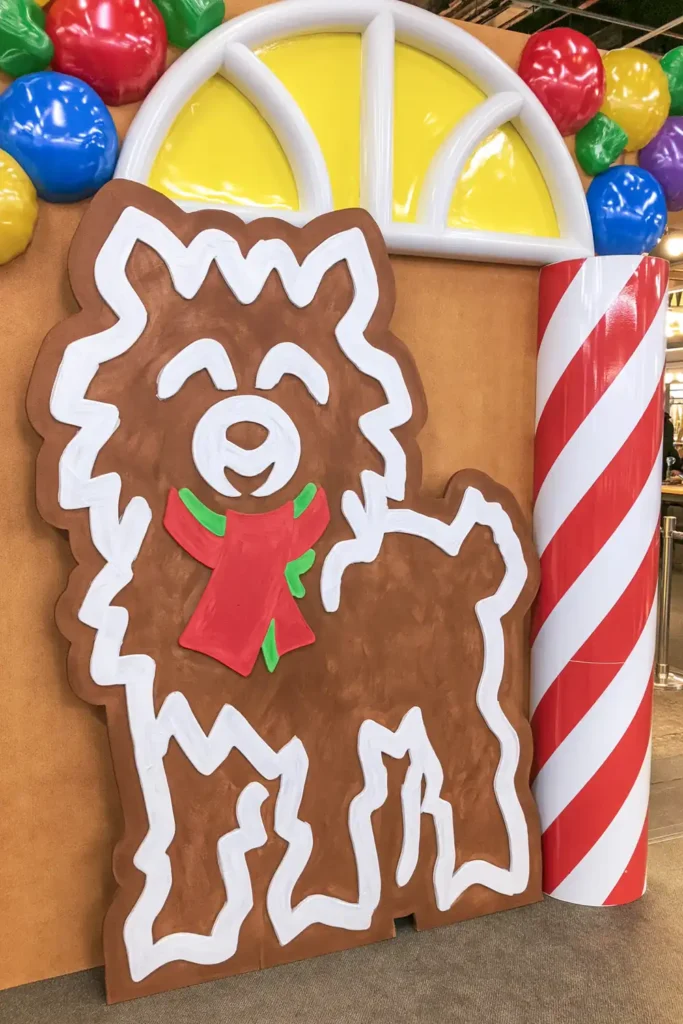
The first concept features large animal-shaped cookie decorations inspired by the Hogwarts houses, complete with colorful scarves and white icing-style details.
What makes this idea interesting is the combination of familiar gingerbread-cookie styling with different animal silhouettes. Each decoration looks like a giant shaped cookie rather than an ordinary flat character cutout.
Insulation foam is useful for creating these oversized figures because it can be carved into rounded outlines without making the decorations too heavy.
After cutting out the animal shapes, paint the main surfaces in warm cookie-brown tones. Keep the outer edges slightly rounded to make the figures look thicker and more like baked cookies.
You can use colored paint for the scarves and white craft foam for the decorative icing details. Raised foam embellishments give the figures a layered appearance, especially around the facial features and scarf edges.
I would keep the icing patterns clear and recognizable rather than adding too many tiny details. Large white outlines, simple decorative features, and strong scarf colors are easier to appreciate when the cookies are displayed beside a full-sized entrance.
For a coordinated arrangement, position the mascot cookies on either side of the doorway or against the gingerbread-colored wall panels. Their warm brown surfaces will relate naturally to the house, while the colored scarves bring in additional visual interest.
If you plan to use them outside, protect the foam with compatible weather-resistant coatings and secure each figure to a stable support. Thin craft foam and ordinary adhesives may not hold up well in rain or strong wind, so choose materials suited to your display location.
These oversized cookies can also be designed as separate decorations, making them easier to remove, store, and reuse without dismantling the entire gingerbread house.
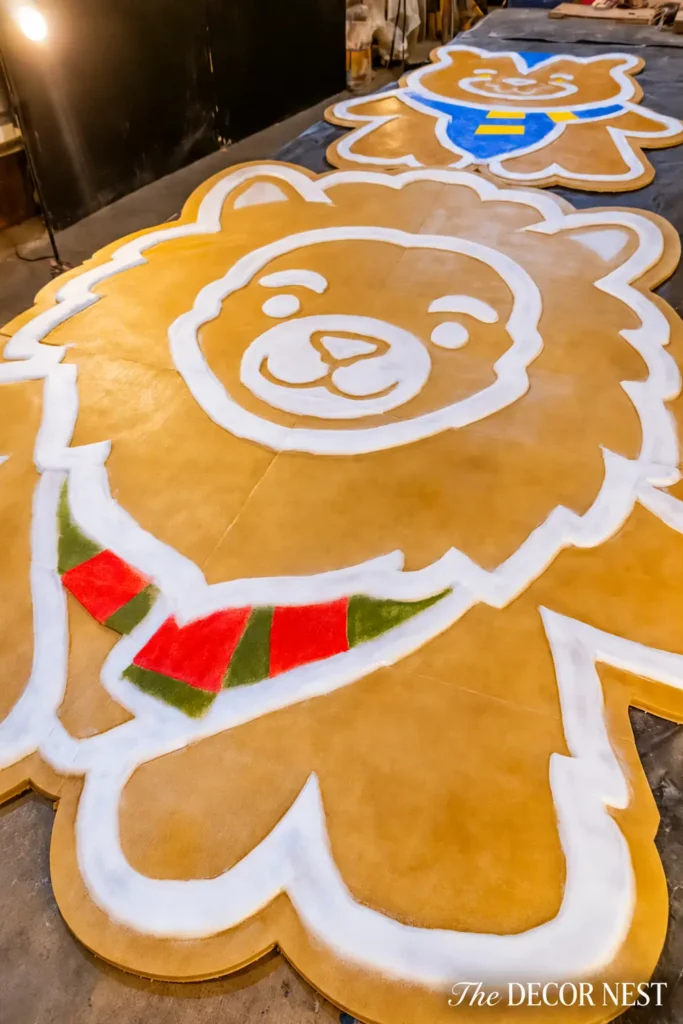
Add Raised White Icing Details to Giant Gingerbread Cookies
One of my favorite details on a giant gingerbread display is the thick white icing that makes the decorations look like real cookies. Even a simple foam cutout becomes much more convincing when you add raised outlines and decorative patterns.
Instead of painting every icing detail directly onto the surface, use white craft foam to give the decorations a little dimension. This creates the appearance of piped icing sitting on top of the cookie.
Start with an oversized cookie figure made from carved insulation foam and painted in a warm gingerbread brown. The rounded edges are important because they make the figure look thick and substantial rather than like a flat wooden sign.
Cut narrow strips of white craft foam and arrange them along the outer edge of the cookie. You can follow the natural curves of the shape, creating a continuous icing border that stresses its silhouette.
For animal-shaped cookies, add simple icing details around the eyes, nose, and other recognizable features. The first design also includes decorative scarves, which provide an opportunity to layer colored sections with smaller white embellishments.
I would keep the icing slightly raised rather than perfectly flat. Those faint shadows around the foam details make the cookie look more dimensional, especially when viewed from an angle.
The nice thing about this technique is that you can repeat the same white icing style across several different cookie figures. Even when the shapes and scarf colors vary, the matching outlines make them feel like part of one collection.
For outdoor displays, ordinary craft foam may need to be replaced with a more durable, weather-resistant material. Look for products such as closed-cell polyethylene foam, extruded polystyrene (XPS) foam insulation boards, or marine-grade PVC foam, as these options have been designed to resist moisture and temperature changes. Some outdoor-rated EVA foam sheets and specialized exterior architectural foam trims can also be good alternatives. Use adhesive compatible with both surfaces, and always protect the finished decorations from moisture to ensure your decorations last through the season.
When the giant cookies are arranged beside the gingerbread house, their white icing details visually connect with the snow-covered roof and peppermint columns.
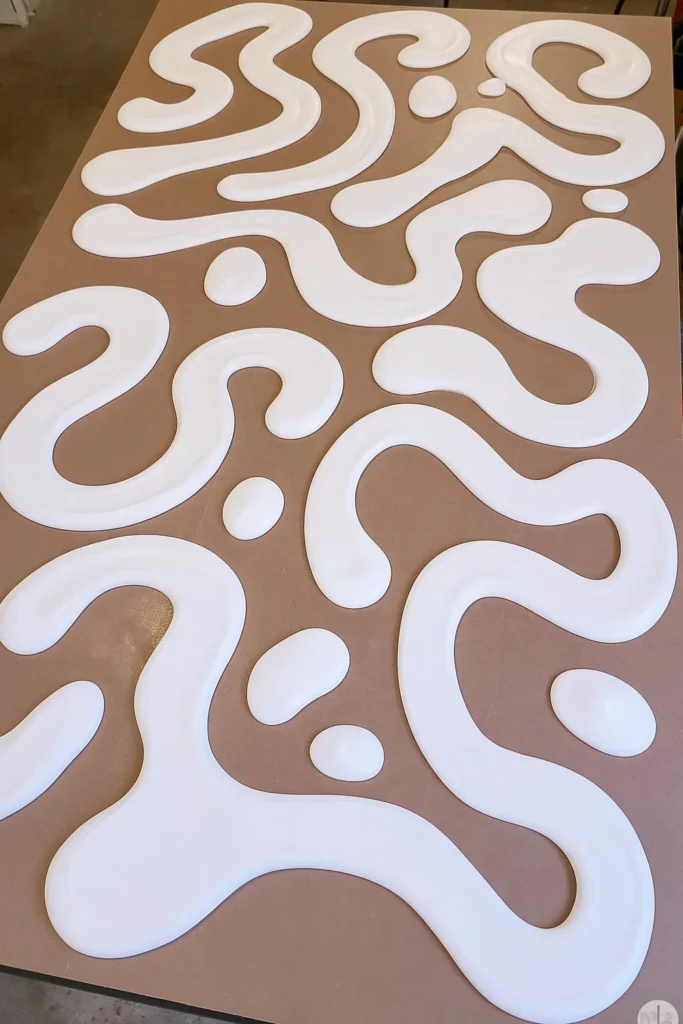
Make Candy-Colored Gingerbread Windows with Cellophane
Bright candy-colored windows can make a gingerbread house feel cheerful, even when the structure itself is made from simple painted panels.
The earliest design uses carved insulation foam, bright yellow poster board, and transparent cellophane to create decorative windows with a glossy, candy-like finish.
Rather than installing real windows, you can build shallow decorative window shapes directly onto the gingerbread house walls.
Begin by creating a window opening or framed area using insulation foam. The foam gives you enough depth to create a noticeable border around the colored center.
Place bright yellow poster board behind the frame to establish the window color. Yellow works especially well against gingerbread-brown walls because the contrast makes the windows visible from a distance.
Next, add a smooth layer of transparent cellophane over the colored backing. Its reflective surface gives the window a glossy finish that resembles a candy wrapper.
I like the simplicity of this combination. You don’t need complicated lighting or actual glass to create an interesting window effect. The yellow backing provides the color, while the cellophane adds a little shine when light reflects across it.
If your gingerbread house has matching wall panels on both sides of the doorway, consider placing the windows at the same height. Repeating their shape and color helps keep the entrance balanced.
You can also use the thickness of the foam frames to create a stronger outline, giving the windows a more substantial appearance against the flat wall panels.
For outdoor use, paper and ordinary cellophane are best reserved for protected locations. A more weather-resistant adaptation would use exterior-grade colored panels and a clear plastic covering secured against wind and rain.
These windows are decorative rather than functional, so you don’t need to cut through the entire wall unless the design specifically requires it.
The finished yellow windows bring a bright touch to the gingerbread house and help break up larger areas of brown wall surface.
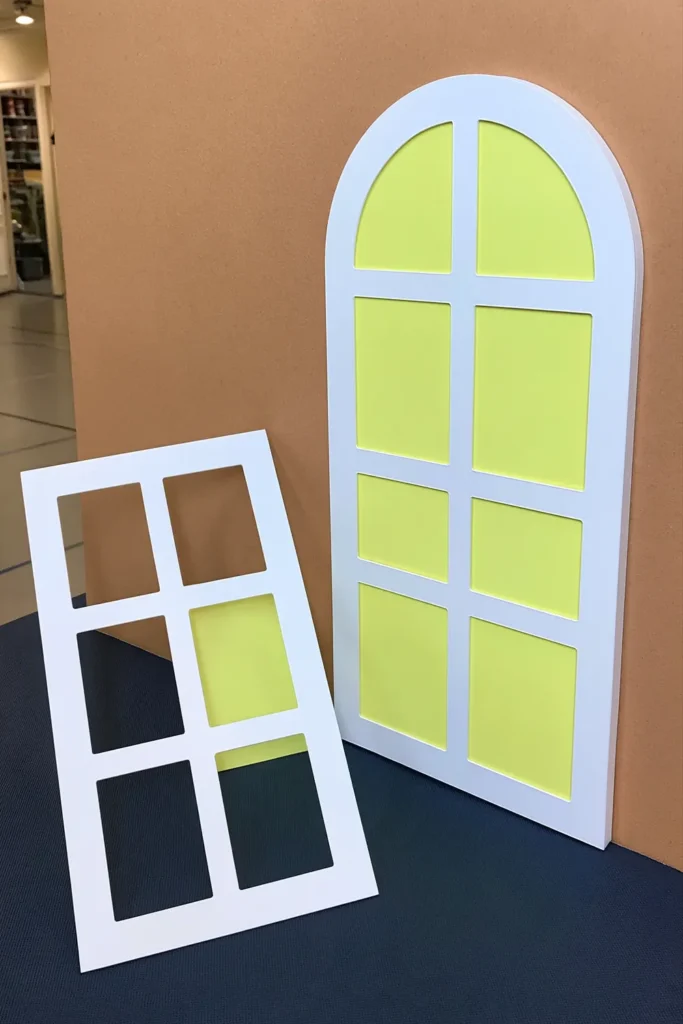
Cover the Gingerbread House Walls with Oversized Colorful Gumballs
A gingerbread house can have beautifully painted walls and still feel a little plain until you add the candy decorations.
Oversized gumballs are an easy way to introduce bright color and playful dimension across the facade without covering every inch of the surface.
The original concept idea uses halved plastic ornaments painted in glossy colors. Once attached to the wall panels, the rounded halves look like giant gumballs pressed into the gingerbread house.
Start with round plastic ornaments that have smooth surfaces and a size proportionate to your house. Cutting suitable ornaments into halves creates lightweight dome-shaped pieces that sit closer to the wall than full spheres.
Paint the pieces in a variety of bright candy colors. A glossy finish is especially effective because it makes each round decoration resemble a shiny sugar-coated sweet.
I would spread the colors across the gingerbread walls rather than grouping every matching shade together. Mixing the ornaments creates a more playful pattern while allowing each color to stand out.
Before attaching anything permanently, arrange the gumballs on the wall panels and check the spacing from a distance.
Some can sit near the candy-colored windows, while others can decorate the open areas around the doorway. Keeping enough space between the ornaments allows the gingerbread-brown background to remain visible.
The original construction uses caulking to attach the ornament halves to the panels. For an outdoor version, choose a sealant or adhesive rated for the specific plastics and painted surfaces, and make sure it can tolerate changing temperatures.
One particularly useful detail is to keep a gumball accent removable where access to a wall switch or another functional feature is needed.
Instead of permanently covering that area, create a detachable candy decoration that blends with the surrounding ornaments. That way, the display looks consistent without blocking something you may need to reach.
When choosing attachment methods, remember that lightweight ornaments can still become loose in strong winds. Secure them carefully and inspect the decorations during the season.
The finished gumballs add a dimensional candy-shop effect that pairs naturally with the striped peppermint columns and yellow gingerbread windows.

Arrange a Symmetrical Gingerbread House Entrance with Candy Decorations
Once the roof, windows, columns, and cookie decorations are ready, arranging everything together is what turns the individual pieces into one complete gingerbread house.
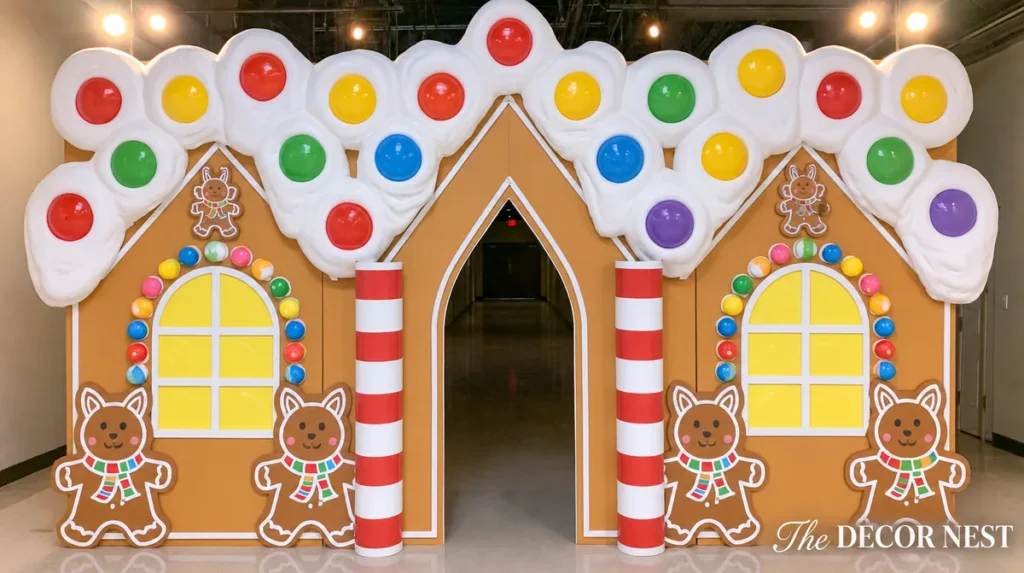
The first display uses a full-height gingerbread facade with a snowy pitched roof, red-and-white peppermint columns, yellow windows, colorful gumballs, and oversized mascot cookies arranged around the entrance.
The strongest feature of this design is its symmetry.
The doorway forms the center of the display, while coordinating peppermint columns frame it on both sides. The roof sits above the entrance, and decorative wall panels extend outward to create the appearance of a small cottage.
I would begin by positioning the largest features first. Secure the main structure, add the snowy roof pieces, and place the peppermint columns where they clearly frame the doorway.
Next, arrange the candy-colored windows on the surrounding wall panels. Try to keep their height and spacing consistent so they feel like part of the house rather than separate decorations.
Once those larger elements are in place, fill the open wall areas with oversized gumballs. Their rounded shapes introduce color without competing with the overall architectural silhouette.
Finally, position the giant cookie figures near the entrance. These decorations can sit toward the lower portions of the display, where their shapes and icing details are easier to appreciate.
One thing I would avoid is packing every decoration too tightly together. Leaving visible areas of gingerbread-brown wall between the elements helps the individual candy details stand out.
The white snow, red peppermint stripes, yellow windows, and colorful gumballs already create a lively combination. Giving each feature a little breathing room keeps the display charming rather than crowded.
For an outdoor installation, choose a level, stable location and make sure the facade is securely anchored before adding decorations. Use ground stakes, weights, or brackets appropriate to your surface to prevent the structure from shifting or tipping, especially in windy conditions. Check all joints and fastenings for stability, and frequently inspect anchors during the display period to guarantee everything is secure. Keep the doorway unobstructed, maintain enough clearance for walking through, and avoid placing freestanding pieces where they could be knocked over. If you have children or pets, ensure that all large decorations are weighted or anchored so they cannot fall or be pulled loose accidentally.
A covered porch or sheltered entrance can help protect the decorative details, but the structure still needs to be designed for the wind and weather conditions at your location.
The result is a coordinated candy-inspired entrance in which every decoration contributes to the identical playful gingerbread house design.
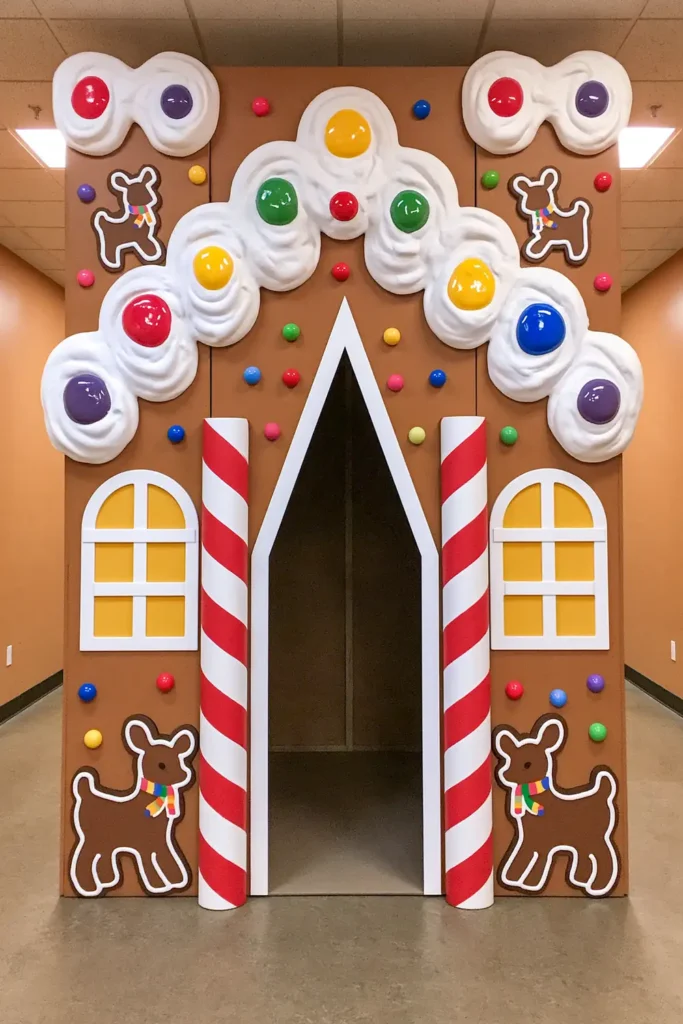
Display Freestanding Giant Gingerbread Cookies Beside the Entrance
Giant gingerbread cookies don’t have to be attached directly to the house to make an impression. Some of the most charming decorations are the oversized cookie figures standing beside the entrance, almost like playful characters welcoming visitors.
The original design uses carved insulation foam to create large cookie-shaped figures, with white craft foam details, colorful scarves, and simple supports attached to the back.
What I like about freestanding decorations is the flexibility they give you. You can position them near the doorway, move them slightly forward from the walls, or modify their placement without changing the main gingerbread house structure.
Start with thick insulation foam and cut out your chosen cookie shapes. Animal-shaped figures work especially well for this design, particularly when they have rounded outlines and recognizable features.
Paint the figures in a warm gingerbread-brown color, then add white icing-style borders around their edges. Colored scarves and layered foam details help each cookie feel distinct while preserving the same overall decorating style.
To make the figures stand independently, the original concept uses easel-style supports attached to the back. These supports angle backward, allowing the decorative cookies to remain upright without being fastened to the wall panels.
For an indoor display, that arrangement can be practical because the cookies remain easy to reposition.
Outdoors, however, a lightweight easel support alone may not provide enough stability. A large foam figure can catch the wind, so use a properly weighted or anchored support system designed for the conditions at your location.
You can additionally position the figures near the main structure, where their supports can be securely attached to an appropriate part of the frame.
I would arrange the cookies at slightly different positions beside the entrance rather than placing every figure in one straight line. A little variation in their placement gives the display more depth while keeping the doorway clear.
Their colors should still coordinate with the house. The warm brown cookie surfaces connect with the gingerbread walls, while the white icing echoes the snowy roof and peppermint stripes.
Because the figures are separate pieces, they are also easier to store once the display comes down. Protect the painted surfaces, keep the foam away from sharp objects, and store the decorations somewhere dry.
These freestanding cookies are a lovely finishing touch because they extend the gingerbread theme beyond the walls alone, making the entrance feel like part of a larger candy-inspired scene.
Bring Your Gingerbread House Display Together
Creating your own DIY life-sized gingerbread house outdoor decor is really about combining simple construction materials with oversized details that look playful and inviting.
A wooden facade gives the display its shape, while the sculpted snowy roof, peppermint columns, candy-colored windows, and colorful gumballs provide the recognizable gingerbread-house appearance. Giant cookie decorations bring everything together and add character around the entrance.
You don’t have to make every element at once. Starting with a sturdy house-shaped entrance and adding a few carefully chosen candy details can create a beautiful result. You can always expand the display with more foam cookies or colorful ornaments later.
To help you plan your project, here’s a suggested timeline you can follow:
1. Design and Gather Materials: Set aside an afternoon to sketch your design, make a list of the decorations you want, and gather your supplies.
2. Build the Main Structure: Allow a day or weekend to construct the wooden frame and attach the Masonite panels. If needed, paint the panels and let them dry fully before moving on.
3. Create and Attach the Roof: Carve and paint the foam roof pieces, with time for them to dry, then securely attach them to the frame.
4. Add Major Features: Over another day or two, prepare and install the peppermint columns, candy-colored windows, or other large decorative details such as oversized gumballs.
5. Make and Decorate Giant Cookies: While the structure is drying, shape, paint, and add icing details to the mascot cookies or freestanding cookie decorations.
6. Arrange and Secure: Position your decorations around the entrance, adjusting for balance and symmetry. Make sure all pieces are securely attached, especially for outdoor displays.
7. Final Touches: Add extra accents, check all decorations for weather resistance, and make sure the entrance is clear and safe.
You can space out these steps over several days or weeks, working in stages as your schedule allows.
If your gingerbread house will be outdoors, make weather resistance and structural stability part of the plan from the beginning. Secure the frame, choose materials that can handle moisture, and make sure decorative pieces won’t become loose in the wind.
My favorite part of this project is how ordinary materials such as lumber, foam, PVC, and plastic ornaments can unite to form something so imaginative.
Choose the details you love most, keep the colors coordinated, and build a gingerbread house entrance that feels special every time you walk toward it.